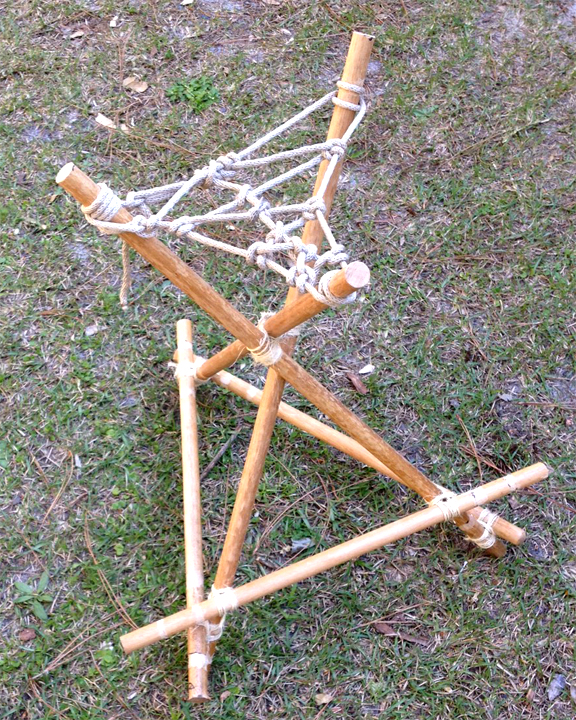
 Often times at a campsite, there are no picnic tables with benches, or array of thick, wooden discs from downed trees positioned around a fire site, or fallen tree trunks, or a large outcrop of smooth boulders. So, through the years, the answer to the query, “what will I sit on during a camping trip?” has given rise to many solutions. Some of these are: a square sheet of plastic, a five-gallon bucket, an ice chest, a carry case, an upside down recycle bin, and of course a wide variety of folding and collapsible camp chairs and stools.
When it comes to actually fashioning a camp seat by making one from what you have on hand, Scouts have come up with a variety of creative ideas. Here’s one that, when properly built, will not only be stable, but also quite comfortable.
MATERIALS
- three 32-inch sticks for the legs
- three 24-inch sticks for the bottom braces
- one 10-foot length of binder twine for the tripod lashing -or- one 10-foot lashing rope
- six 6-foot lengths of binder twine for the square lashings -or- six 6-foot lashing ropes
- one 15-foot length of 1/8 to 1/4-inch braided nylon cord for the seat
The sticks you use for this seat are vital to its stability. They have to be strong. It’s going to be rare to get natural wood on the camping trip that’s straight and strong enough to furnish these materials. Leave No Trace and Outdoor Ethics dictate we don’t cut these sticks from living trees. If they can be harvested from downed trees, great! Good broom sticks are 1-inch in diameter and can be acquired by the box full. Once cut into the right lengths, they can be used again and again for a variety of Scout Pioneering gadgets.
PROCEDURE
There are two main objectives when building this camp seat. One: the tripod legs must be spaced evenly from one another so the structure is well-balanced. Two: the lashings and how the webbing is attached to the legs must be tight enough to keep from slipping.
Prepare the sticks: Since it’s so important to have everything even, before lashing can begin, points where the sticks will meet should be marked out. If the materials will be used repeatedly, it will be practical to mark out a complete series of points on every stick so that each can be used interchangeably.
On the 24-inch sticks, mark out 2 inches, 4 inches, and 6 inches from each end.
On the 32-inch sticks, mark out 2 inches, 4 inches, and 6 inches on the bottoms for the braces, 20 inches up from the bottom for the tripod lashing, and 30 inches up from the bottom for the webbed seat.
Note: When preparing a kit to make this seat, especially when using smooth poles, use a bastard cut wood rasp file to cut a slight roughed out indentation around the diameter of the sticks at the above points, in order to keep everything from sliding.
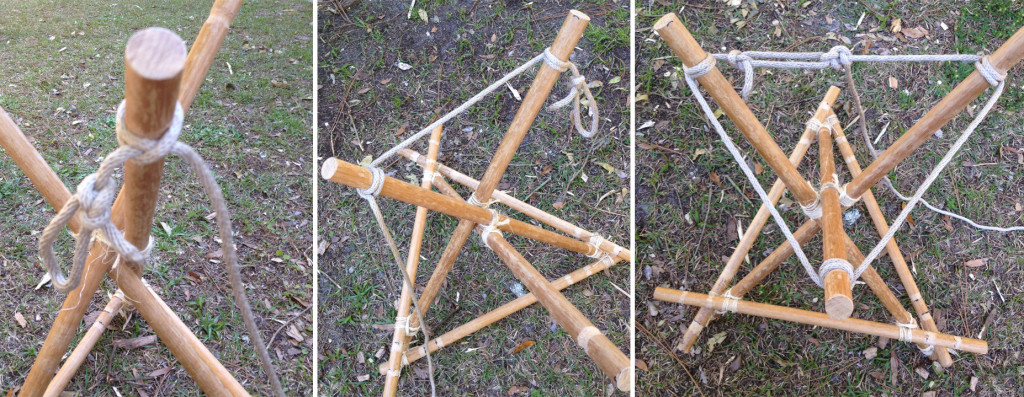
Lash together the tripod: With the 32-inch sticks parallel to one another, lash them together at the 20-inch mark with a tight tripod lashing. Racking turns are preferred, weaving the wraps in and out between the poles. Make sure the line bites into the sticks as much as possible where they have been roughed out. Spread the legs out making sure the middle leg, which will eventually be the front leg, is on top of the two outside legs.
Lash on the bottom braces: Turn the tripod upside down. With tight square lashings, lash the 24-inch braces to the legs, marrying them to legs at the corresponding markings: 2-inch to 2-inch, 4-inch to 4-inch, 6-inch to 6-inch. Doing so will assure the legs are spread equally apart into an equilateral triangle. Again, make sure the line bites into the sticks as much as possible where they have been roughed out.
 Attach the framework for the mesh seat: Turn the tripod right side up. Attach one end of the 15-foot nylon cord to one leg at the 30-inch mark with a tight clove hitch. Leave enough tail in the short end and in it tie a small loop with a bowline. With another tight clove hitch, join the long end of the cord to the next leg at the 30-inch mark, pulling the cord taut between the legs. Form the half hitches of these clove hitches on the outside of the legs, and make sure the line is biting into the roughed out part of the sticks. Do the same with the third leg.
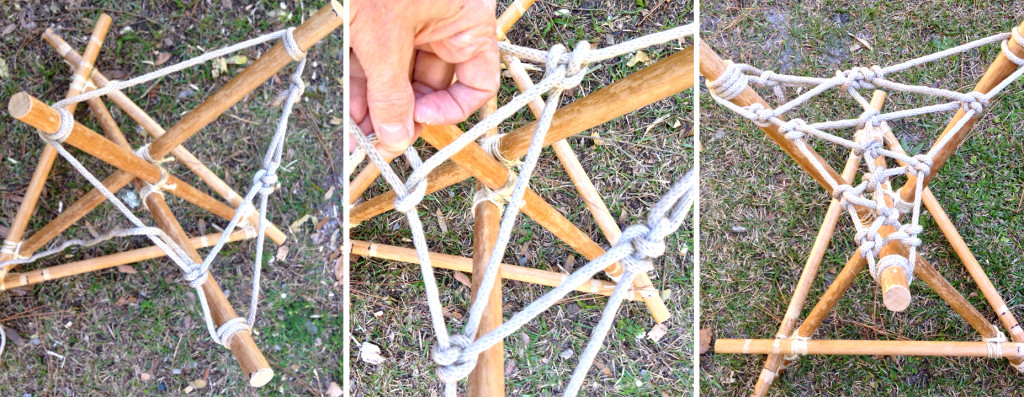
After a clove hitch has been applied to each leg, carry the end of the cord through the loop of the bowline. Pulling it taut, secure it to the loop with two half hitches like you would with a rope tackle. The cord now forms a triangle which will serve as the frame for weaving a seat.
 Weave the seat: Pulling the cord taut as you go, attach it to the nearest part of the triangular frame with a clove hitch and then stretch it diagonally to the opposite leg of the triangle. Tie a clove hitch there and proceed to the next leg of the triangle, tie a clove hitch, and so on. When you have zig-zagged throughout the entire triangle, you will have enough line to tie additional clove hitches down the middle of the triangle where the line intersects with previous portions. Finish by tying a clove hitch to the middle of the first leg of the triangle. Any excess line can be attached with additional half hitches to the nearest 32-inch stick.
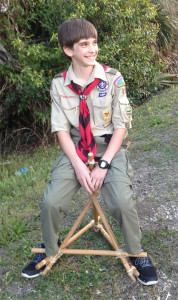
Sit on your camp seat: The front of the seat is the leg of the tripod that is on top of the two others. Straddle this leg and sit down. If your chair has been formed symmetrically and lashed together tightly, and if the webbing was tied on tightly in the right places, you will now be perched very comfortably!


