 The time-tested, traditional monkey bridge is perhaps the most familiar of all Scout pioneering projects. It’s frequently featured at Scout Expos, Camporees, Scout Camps, and is often a central attraction at public gatherings where Scouting is represented.
Using a double A-frame to build a monkey bridge is a departure from the common X-frame that supports the foot rope and hand ropes, but it has two distinct advantages over the X- frame version. First, the double A-frame provides a wider base making it less likely to tip over. The second advantage is that the positions of the A-frames can be adjusted so the span between the hand ropes can be narrowed for better balance as you make the crossing.
Here’s a list of materials:
- eight 8-foot x 4-inch A-frame legs
- four 6-foot x 3-inch A-frame ledgers
- fourteen 15-foot x 1/4-inch lashing ropes for square lashings
- one 50-foot x 1/2-inch or 3/4-inch foot rope
- two 50-foot x 1/2-inch hand ropes
- five 8-foot x 1/4-inch stringer ropes
- six 10-foot x 1/4-inch lashing ropes for strop lashings
- six pioneering stakes for each 3-2-1 anchor -or-
- eight pioneering stakes and one 4-foot x 4 to 6-inch diameter spar for each log-and-stake anchor
- two 10-foot x 1/2-inch polypropylene or manila ropes for rope grommets
- two pieces of scrap canvas or burlap for foot rope saddles
- binder twine for the back stays of anchor stakes
As the saying goes, “there’re many ways to skin a cat.” So it goes, there are many procedures you can follow to build your bridge. Here’s one provided by the designer of the Double A-frame Monkey Bridge, Adolph Peschke:
Building the A-frames – The first step in building this monkey bridge is to build four identical A-frames using the 8-foot spars for the two legs, and 6-foot spars for the ledger. Make sure the ledgers of each A-frame cross the legs at the same height, and that the tips of the legs intersect at an equal distance from the tops. Lash each A-frame together with three tight square lashings.
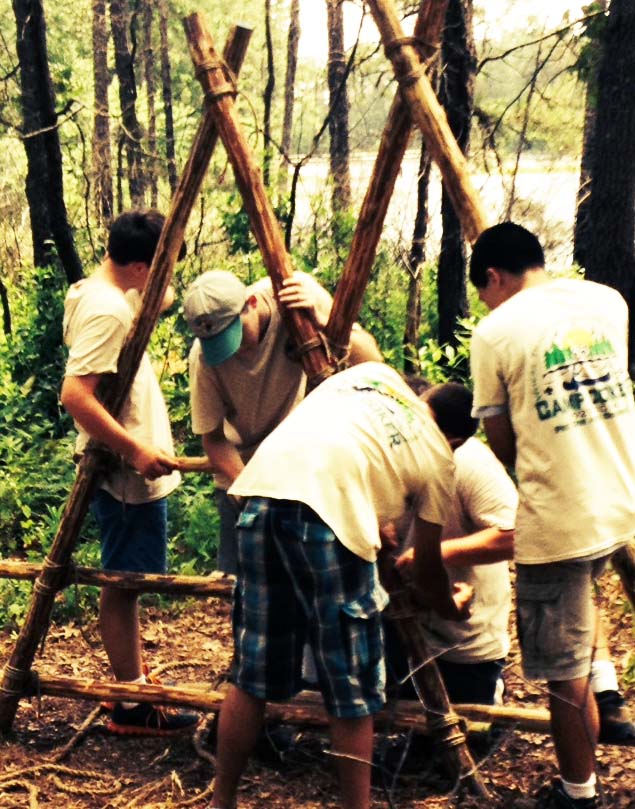 Double A-frame – When you have four identical A-frames, you can lash two of them together. This can be accomplished by holding the A-frames up and maneuvering them into position, or laying one A-frame on the ground and then putting another on top of it so that the bottom ledgers overlap one-half their length (about 3 feet). The first step in lashing the A-frames together is to go up where the two legs cross (the X formed by one leg from each A-frame). Then with a good tight square lashing, lash the two legs together. Note: The point where these two legs are lashed together is where the foot rope will rest. You can adjust the overlap of the two A-frames to adjust how high the foot rope will be off the ground. Also note where the tops of the A-frames are, because this is where the hand ropes will be.
To complete the double A-frame, stand it up so the butt ends of all four legs rest solidly on level ground. Lash the two bottom ledgers together where they overlap with three round lashings or strop lashings. (A strop lashing is easy to tie. Halve the rope, place the midpoint behind what you’re lashing, wrap both ends around the spars a few times and finish with a square knot.)
Site Preparation – Before you can erect the double A-frames, you need to prepare the site. Begin by stretching a length of binder twine along the center line of where the monkey bridge is to stand. Working from the center, measure 10 feet toward each end to mark where the A-frames are to be placed. They should be 20 feet apart. Then mark out another 10 feet from each A-frame to where the anchors are to be built.
Building the Anchors – The foot rope will be attached to anchors at both ends. Before erecting the double A-frames, build a 3-2-1 anchor, or a log-and-stake anchor, 10 feet from where the A-frames will be erected.
Rope Grommet – After the anchors are built, attach a rope grommet with a ring or shackle in it.
Position the A-frames – Prepare to erect the monkey bridge by moving the A-frames into position no more than 20 get apart. Lay them down on the binder twine that marks the center line of the bridge.
Hand and Foot Ropes – Now you can prepare the hand and foot ropes for the monkey bridge. Lay the foot rope in a straight line off to the side of where the A-frames are laying. Then lay the two hand ropes on the ground next to each other so they’re parallel to the foot rope and 42 inches away.
Stringer Ropes – Add the stringer ropes that will go from the foot rope to the hand ropes. Start by attaching the center of an 8-foot long stringer rope (use 1/4-inch manila rope) at the center of the foot rope, with a roundturn. The stringer rope is attached around the foot rope so that both ends are 4-feet long. Add two more stringer ropes on both sides of the center stringer rope (so there are five stringer ropes in all), positioning them about 4 feet apart. Tie one end of each stringer rope to one of the hand ropes, again with a clove hitch. Then do the same with the other ends of the stringer ropes, attaching them to the other hand rope.
 Assembling the Bridge – You’re just about ready to assemble the bridge. First place a piece of burlap or heavy canvas (called a “saddle”) in the V formed by both double A-frames. This will protect the foot rope and allow it to slide a little in the V without interfering with the lashing rope.
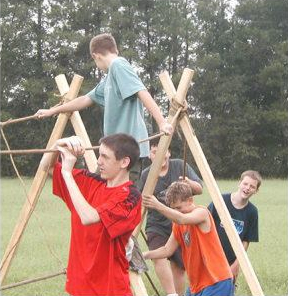
Now get the crew together to erect the bridge. You will need a safety officer to watch for any problems that might occur, and a signal caller to tell the crew members what to do. You will need two Scouts to lift and hold each double A-frame in place, two more Scouts to lift the foot rope into the V of the double A-frames, and two more Scouts to lift the two hand ropes into place at the tops of the A-frames. Lift everything into place. Then, holding the A-frames steady, temporarily tie the hand and foot ropes into the rings of the grommets using a roundturn with two half hitches.
Tightening the Foot Rope – Now you can put a strain on the foot rope. It’s not necessary to use block and tackle since this can put too much strain on the lashings, anchors, and the foot rope itself. Whatever strain three or four Scouts can put on the foot rope by pulling it by hand will be enough. As soon as the bridge is crossed a few times, there will be a sag in the rope. This is fine because it means you are working with reduced strain on the foot rope as a safety measure.
Tightening the Hand Ropes – Next, tie the hand ropes to the top ends of the A-frames. First, loosen one end at a time from the anchors. Then, use a clove hitch to tie the hand ropes to the top end of a leg on each side of the double A-frames. As you’re tying these clove hitches, adjust the strain on the sections of the hand ropes between the double A-frames to match the sag of the foot rope. Also, adjust the length of the stringer ropes so there is even strain between the foot rope and both hand ropes. After the hand ropes are tied to the tops of the A-frames, move down and retie the ends of the hand ropes to the rings in the grommets using a roundturn with two half hitches.
Final Testing – With caution, one crew member can get on the bridge as all lashings, anchors, and knots are observed by the safety officer and all other crew members. Make adjustments as required. If too much sag is experienced during use, re-tighten the hand and foot ropes as necessary.
( Adjusting and maintaining the strain on the hand and foot ropes can be efficiently managed using rope tackles.)