A trestle is the basic component for building a variety of bridges. It’s used to support the walkways.

The most basic and oft-used form of a trestle consists of two legs, two ledgers, and two cross braces. When building a bridge, the top ledger is also called a transom. This is the part that supports the walkways. To make a trestle, the two ledgers are lashed near the top and bottom of the legs and the cross braces are added, lashing them to the legs.
All together, a trestle is composed of nine lashings. Eight of them are square lashings and one is a diagonal lashing, which is used to lash the two cross braces together where they cross in the center. This cross brace, or X-brace, forms four triangles contributing to the trestle’s overall structural integrity.
Legs – When setting out to build the trestle, choose the two spars for legs first. These spars can be most any length, depending on the type and height of the structure you’re building. Lay the two legs on the ground with the two butt ends of the spars at the same end and even with one another. Then add the ledgers.
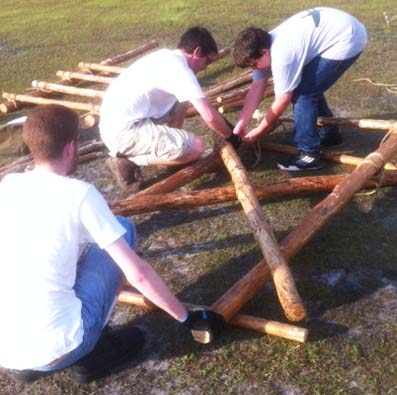
Ledgers – The ledgers are spars that are typically 2 inches to 2-1/2 inches in diameter. The position of the ledgers on the legs will depend on the structure you’re building. There are a couple of general rules to keep in mind:
- Always keep the butt ends of the legs even with each other.
- Except in the case where the tops of two trestles will be interlocked, always keep the legs parallel as you’re lashing on the ledgers.
- All lashings should be tightly tied, and when building a bridge, make sure the larger, top ledger (transom) is tied most tightly.
Cross braces – Next, the cross braces are added. The cross braces are spars that are usually 2 inches in diameter. They are lashed to the legs in a particular sequence:
- Flip the trestle over and work on the opposite side from the ledgers.
- Lash one cross brace to the back side of both legs.
- Lash the bottom end of the second cross brace on the same side as both ends of the first cross brace.
- Lash the other end on the front side—the side with the ledgers. This is done so that the cross braces are standing slightly apart. There will be a gap where they cross at the center.
After the ends of the ledgers and the cross braces are lashed to the legs, stand the trestle up on end. Adjust the trestle so that the legs are parallel. Also check to see that the top ledger is parallel to the ground. If it is not, lower the trestle, untie the lashing, and adjust it.
Diagonal Lashing – When the legs are parallel and the top ledger is parallel to the ground, you’re ready to tie the diagonal lashing to the cross braces while the trestle is standing upright. This lashing is very important to the strength of the trestle. Along with springing the two cross braces together, the diagonal lashing creates triangles that are important to stiffen the arrangement of the spars and to keep the trestle from racking.